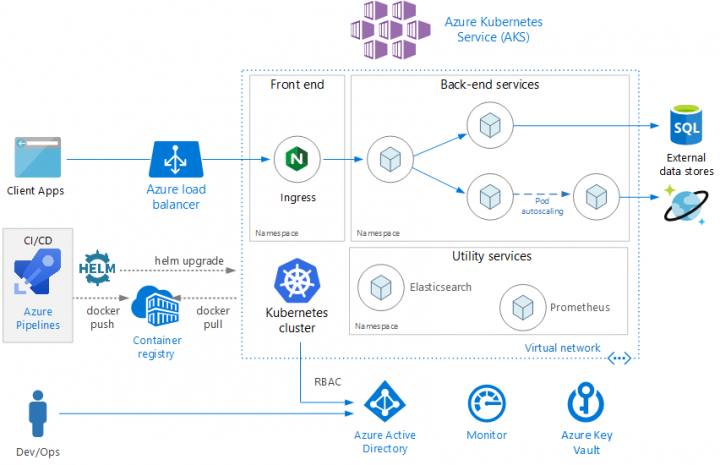
In this series we will be exploring how to set up a CI/CD pipeline to deploy websites and services to Azure Kubernetes Service using Azure DevOps. I’m going to be using Visual Studio 2019 with the Azure Development workload, you’re also going to need the Azure CLI and kubectl for future articles in this series. This first article will guide you through deploying a basic website to AKS using Azure DevOps pipelines. You won’t need to be overly familiar with Kubernetes to follow this however a basic understanding might help.
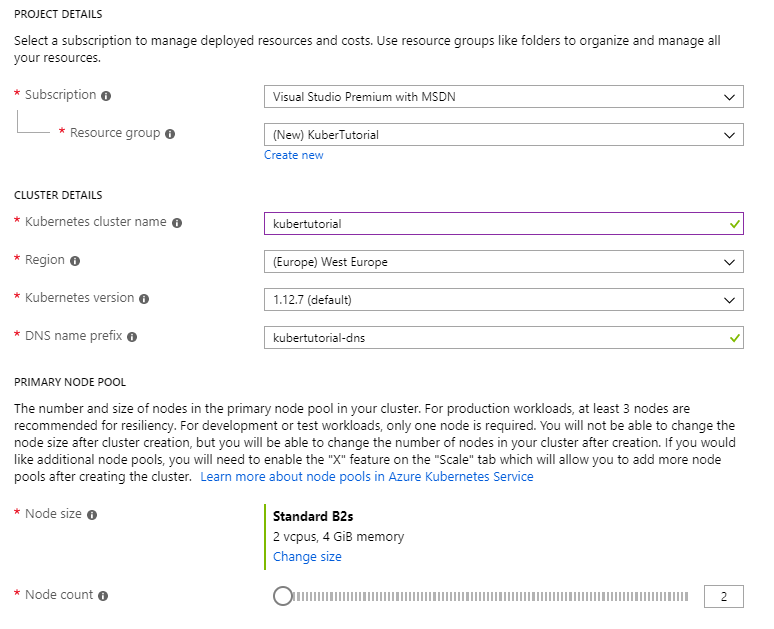
Let’s start by navigating to the Azure portal and creating a new AKS cluster (Kubernetes services > Add). Create a new Resource Group for your cluster, fill in the mandatory fields and set the node size and count.
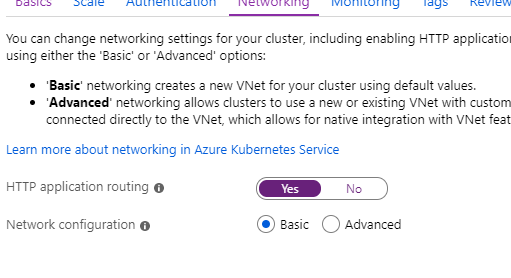
Hit ‘Next’ until you are at the Networking page. I’m going to turn on HTTP application routing as it makes things slightly easier to get setup and test (a future article will replace this setting with our own ingress controller).
Hit ‘Review and create’ and let Azure run its validation (sometimes validation will fail for no reason so if this happens just press ‘Previous’ and then ‘Review and create’ again). Once validation has passed finally press ‘Create’. It will take about 10 mins for Azure to provision everything so whilst that is going on let’s get started with Visual Studio.
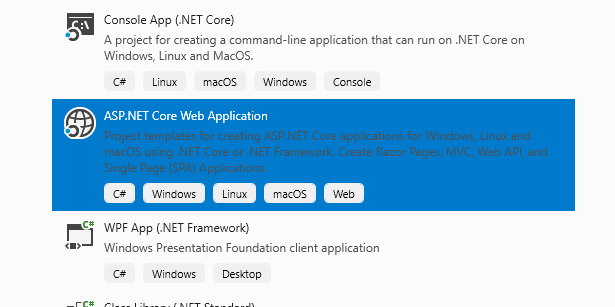
Open up Visual Studio, select ‘Create a new project’ and then select the ‘ASP.NET Core Web Application’ template.
Give your project a name and press ‘Create’. On the next page select ‘Web Application’ and also enable docker support for Linux.

After the project has been created we will have a very basic web application. Feel free to press F5 and see what it looks like. One thing to note is that Visual Studio has generated us a Dockerfile which will be used to run our website in a containerised form.
Next right click on the application, press ‘Add’ and select ‘Container Orchestration Support’.
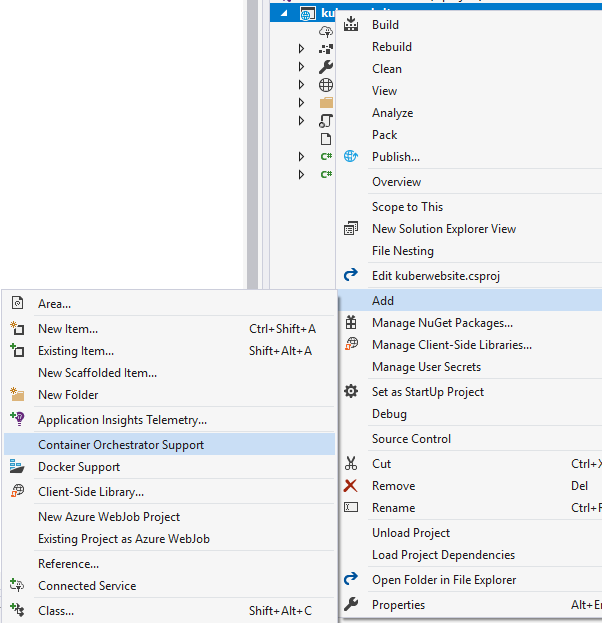
When prompted make sure the container orchestrator is set to ‘Kubernetes/Helm’. Visual Studio will now generate us a helm chart which will allow us to deploy our application to our Kubernetes cluster. We should now have a folder in the solution called ‘charts’, this contains a collection of yaml files which describe our intended deployment. Let’s tweak a few of these!
Open up values.yaml and set replicaCount to 2 (this will create two pods for our website) and set the image, imagePullSecrets, service and ingress sections to the following.
image:
  repository: VALUE_TO_BE_OVERRIDDEN
  tag: latest

imagePullSecrets: []
  # Optionally specify an array of imagePullSecrets.
  # Secrets must be manually created in the namespace.
  # ref: https://kubernetes.io/docs/concepts/containers/images/#specifying-imagepullsecrets-on-a-pod
  #
  # This uses credentials from secret "myRegistryKeySecretName".
  # - name: myRegistryKeySecretName
service:
  port: 80

ingress:
  enabled: false
  annotations:
    kubernetes.io/ingress.class: addon-http-application-routing
  path: /
  hostname: VALUE_TO_BE_OVERRIDDEN
A full copy of my values.yaml file can be found here. We are going to be overriding a lot of these values as part of our CI/CD pipeline which is why some are set to ‘VALUE_TO_BE_OVERRIDDEN’. Next open up deployment.yaml and update the contents to match what I have here – remember to replace ‘kuberwebsite’ with your website name.
ingress.yaml is pretty close to how we want it, I’d recommend changing the rules section to the following as it will pull the servicePort value from our values file (full copy here).
rules:
{{- range .Values.ingress.hosts }}
- host: {{ . }}
http:
paths:
- path: {{ $ingressPath }}
backend:
serviceName: {{ $fullName }}
servicePort: http
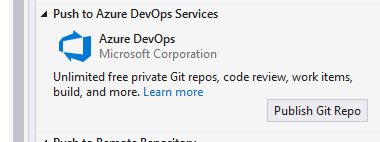
{{- end }}We are now ready to push this code to Azure DevOps. At the bottom right of Visual Studio select ‘Add to Source Control’ and then ‘Git’. When prompted press ‘Publish Git Repo’ under ‘Azure DevOps’.
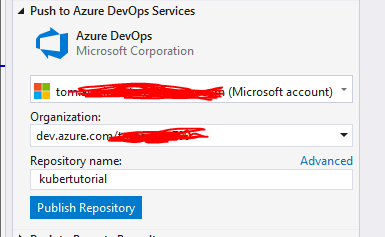
Select your organisation and give your repository a name, then press ‘Publish Repository’.
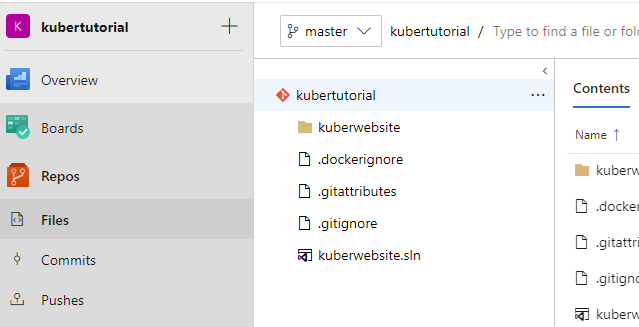
Once pushed we should be able to open up Azure DevOps and see our new project along with the code we just pushed.
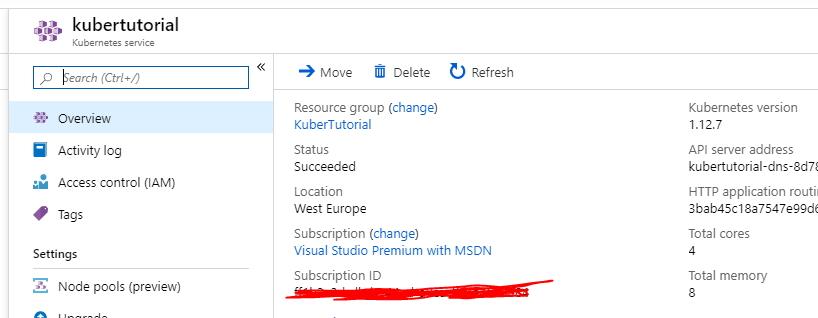
Before going any further let’s go back to Azure and check on our deployment. Hopefully the cluster will have been provisioned!
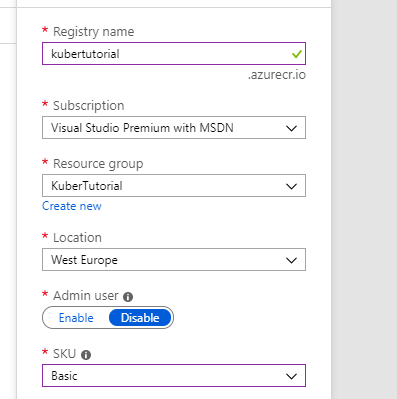
Whilst we are in the Azure Portal let’s quickly make a ‘Container registry’ to store our images. Give your registry a unique name and add it to our previously created resource group (I’ve also set my SKU to basic) before pressing ‘Create’.
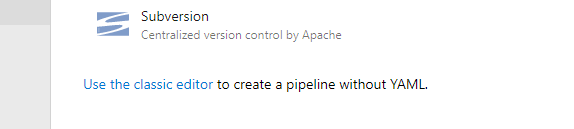
Back to Azure DevOps now and let’s navigate to the Pipelines page. When you are there press the ‘Create Pipeline’ button. We are going to be using the classic pipelines editor for this tutorial as its slightly easier to follow so let’s press ‘Use the classic editor’ at the bottom.
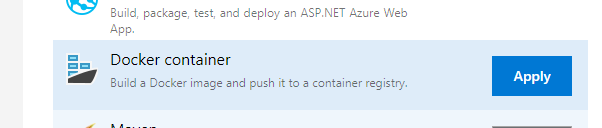
On the next page leave everything at their default values and press ‘Continue’. When prompted to select a template let’s go with ‘Docker container’.
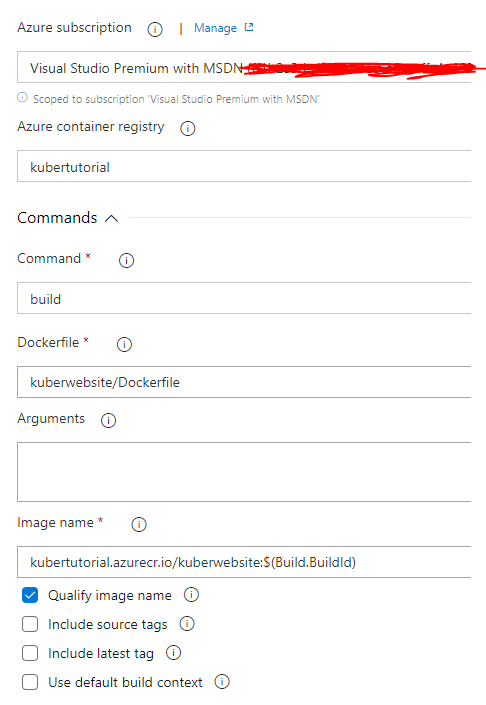
Once at the Task page select ‘Build an image’ – we need to set some configuration here! Start by setting the Task version to 1.* and then set your Azure subscription (if it’s not listed press ‘Manage’), authorise it if you need to. Then select the Azure Container Registry we previously created, select the Dockerfile by pressing the … button and then set the ‘Image name’ field to your container login server (this can be seen when you select the container registry in the Azure Portal) followed by a ‘/’, your website name followed by :$(Build.BuildId). Finally un-tick ‘use default build context’. You should have something which looks like this:
Now let’s configure the ‘Push an image’ task. A lot of the fields can be set to the same values as the fields in the ‘Build an image’ task so replicate the Azure subscription, Azure Container Registry and the Image Name. Make sure the command is set to push and you should be set.
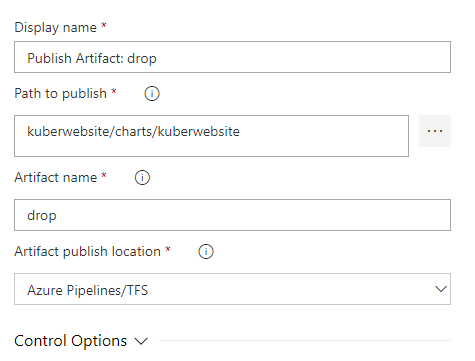
The final step is to add a new task to publish our Helm chart. Press the + button to add a new task and select ‘Publish Build Artifacts’. Once added select the task and change ‘Path to publish’ to your charts directory and set the ‘Artifact name’ field to ‘Helm’.
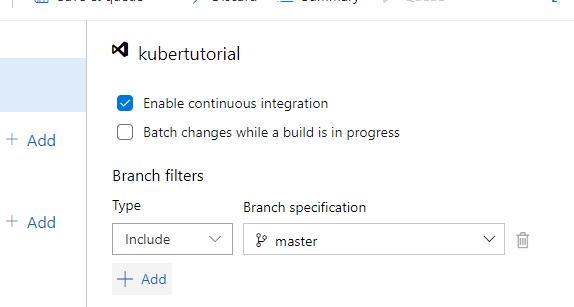
Let’s quickly turn on continuous integration by navigating to the ‘Triggers’ tab and toggling ‘Enable continuous integration’. This will instruct Azure DevOps to build and push our container whenever we push code changes to the repo.
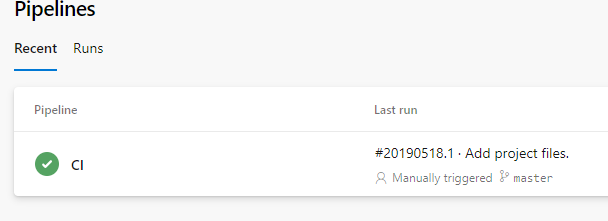
We can now give our pipeline a name and press ‘Save & queue’ to give it a test. Azure DevOps will now build our container and push it to our container registry. Hopefully we get a nice green tick showing everything has worked!
Now we need to configure a release pipeline to deploy our container to the Kubernetes cluster. Navigate to ‘Releases’ and press ‘New pipeline’, when prompted to select a template just press ‘Empty job’.
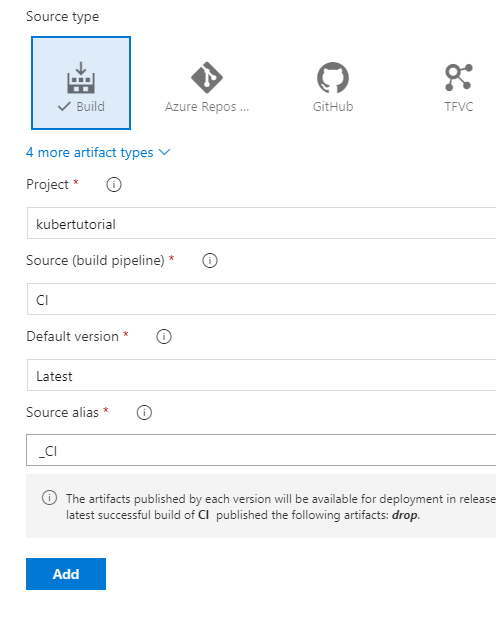
Let’s start by adding an artifact. Set the ‘Source’ field to the build pipeline we previously created and press ‘Add’.
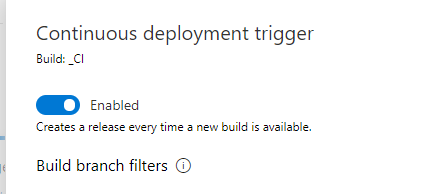
Before we add any tasks let’s quickly set a continuous deployment trigger by clicking the lightning bolt symbol on our artifact and enabling the trigger.
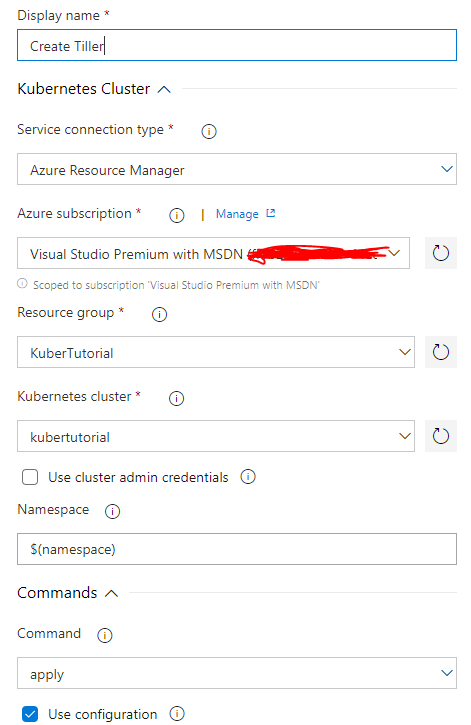
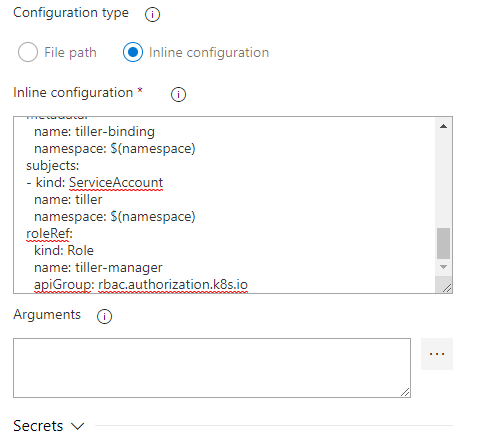
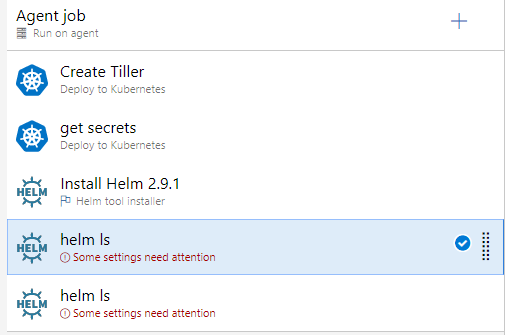
Under ‘Stage 1’ press ‘1 job, 0 task’ and then we can start adding some tasks. First we need to setup the Tiller environment so add the ‘Deploy to Kubernetes task’, set the ‘Service connection type’ to ‘Azure Resource Manager’ and select the correct subscription, resource group and Kubernetes cluster. Set namespace to ‘$(namespace)’ – we will add a variable for it later on and set ‘Command’ to apply. Now select ‘Use configuration’ and set ‘Configuration type’ to inline. Copy and paste this text into the ‘Inline configuration’ field. Hopefully you should have something which looks like this:
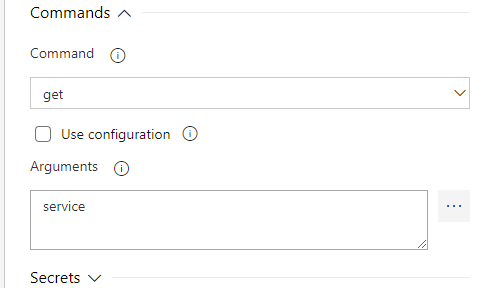
Now we need to pull some secrets from Azure so add another ‘Deploy to Kubernetes’ task and set the Kubernetes values to the same ones we set on the previous task. In the ‘Command’ field set it to ‘get’ and set ‘Arguments’ to ‘service’.
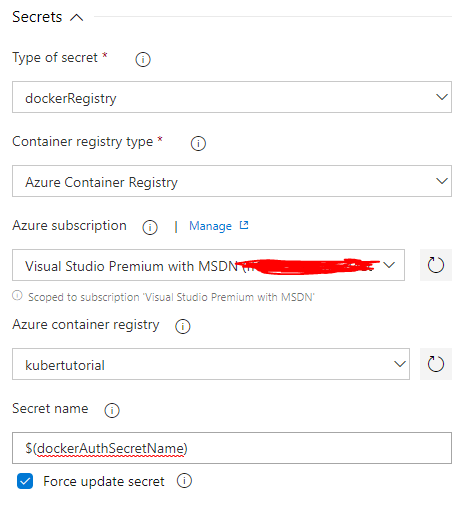
Now expand the ‘Secrets’ section and select the subscription and registry, in the ‘Secret name’ field type ‘$(dockerAuthSecretName)’.
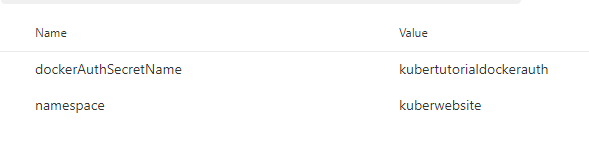
Before we add anymore tasks let’s quickly add the variables we have specified. Navigate to the ‘Variables’ tab and add two variables; one for dockerAuthSecretName and one for namespace. Set ‘dockerAuthSecretName’ to the name of your Kubernetes cluser followed by docker auth and set namespace to the name of your website.
Now let’s go back to the ‘Tasks’ tab and the ‘Helm tool installer’ task, leave everything at their default values. Now add two ‘Package and deploy helm charts’ tasks.
In the first task select your Azure subscription, resource group and Kubernetes cluster. Set the ‘Command’ value to ‘init’, un-tick ‘Upgrade Tiller’ and type the following in the Arguments box.
--service-account tillerYou should have something which looks like this:
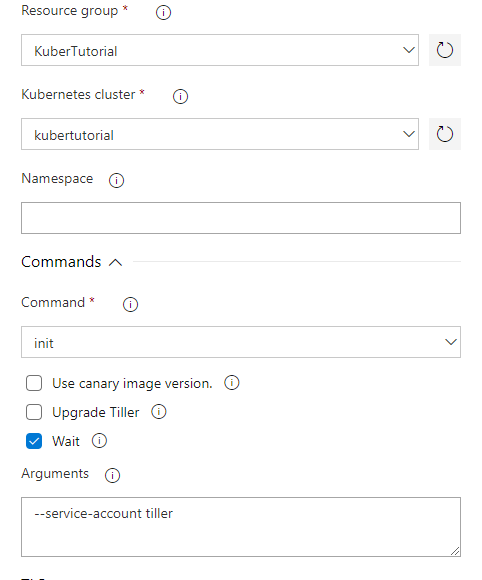
Now expand the ‘Advanced group and set the ‘Tiller namespace’ field to $(namespace).
On the second Helm task set the subscription, resource group and cluster fields like we have previously set. Set Namespace to $(namespace), ‘Command’ to ‘upgrade’ and ‘Chart Type’ to ‘File Path’. Now select your chart artifacts using the … button. Set ‘Release Name’ to your website name. Now select ‘Install if release not present’ and ‘Force’ before typing the following into the ‘Arguments’ box. Make sure you substitute the image.repository value with your own and set ingress.hostname to the HTTP application routing domain of your cluster (this can be found when you select your cluster in the Azure Portal).
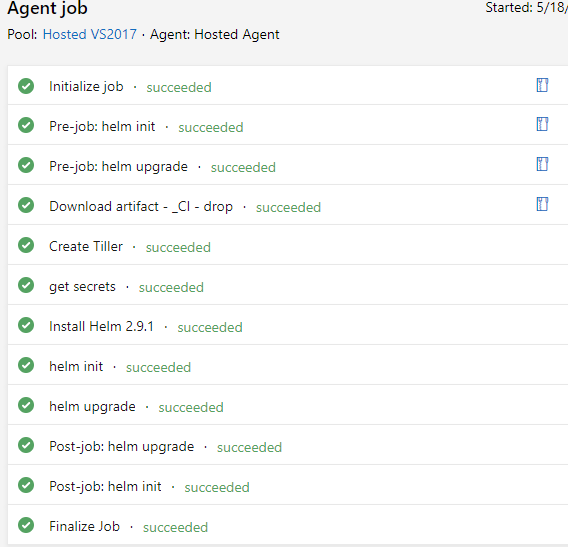
--set image.repository=kubertutorial.azurecr.io/kuberwebsite --set image.tag=$(Build.BuildId) --set service.port=80 --set ingress.enabled=true --set ingress.hostname=$(namespace).3bab45c18a7547e99d6c.westeurope.aksapp.io --set imagePullSecrets={$(dockerAuthSecretName)} --timeout 900These arguments are overriding some of the values we have set previously in our values.yaml file. Now expand the ‘Advanced’ group and set ‘Tiller namespace’ to $(namespace). Now give your pipeline a name (I chose ‘CD’) and press ‘Release’ – ‘Create release’. Now we wait patiently. Hopefully after a few minutes the release completes and we have a lot of green ticks!
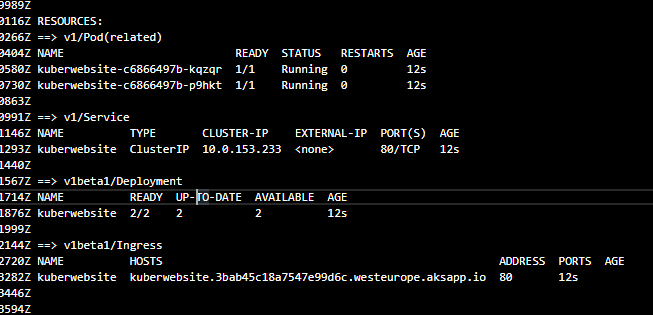
If we expand the ‘helm upgrade’ section we should be able to see that we have two pods running with our container in and also the ingress hostname.
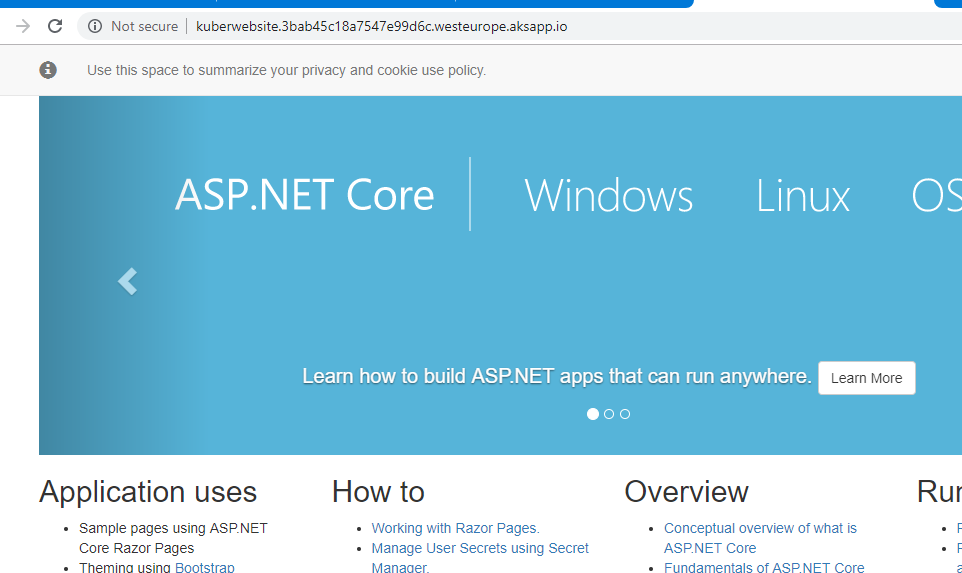
It will take a few minutes for DNS to start working but once it does you should be able to access your website by navigating to the ingress hostname using your browser.
All of the source code for this article can be found here. The next article in this series will guide you through deploying an api for your website and using kubectl to manage your cluster.